
Over the week of Christmas I was on vacation. It was lovely. It was also high time that I redo my master bathroom. I shared my inspiration photo and what my bathroom looked like here.
Of course painting was first. I bought one measly gallon of Valspar Ultra Paint + Primer in which was no VOC low odor. This was the first time I purchased no VOC low odor and I am SOLD! The color is Moose Mousse in Eggshell and I used every last drop in that can and got 2 coats out of it! While I was painting Kiera had a grand time playing with all the junk I had laying around. She kept calling something Bob, making bridges out of different things, firing me from painting though she was apparently fired too and when I asked who was going to finish painting she had no response. Oh and we don't own a ladder and our step stool wasn't tall enough for me to reach in some places so I had to use one of our bar stools. Jimmy wasn't too happy about that but I was finished with it by time he saw it. I wiped all the paint off anyway. Otherwise you see I stood on the tub, or the counter top, or the toilet. This was also the first time I ever used Frog tape,which was amazing!
Of course painting was first. I bought one measly gallon of Valspar Ultra Paint + Primer in which was no VOC low odor. This was the first time I purchased no VOC low odor and I am SOLD! The color is Moose Mousse in Eggshell and I used every last drop in that can and got 2 coats out of it! While I was painting Kiera had a grand time playing with all the junk I had laying around. She kept calling something Bob, making bridges out of different things, firing me from painting though she was apparently fired too and when I asked who was going to finish painting she had no response. Oh and we don't own a ladder and our step stool wasn't tall enough for me to reach in some places so I had to use one of our bar stools. Jimmy wasn't too happy about that but I was finished with it by time he saw it. I wiped all the paint off anyway. Otherwise you see I stood on the tub, or the counter top, or the toilet. This was also the first time I ever used Frog tape,which was amazing!

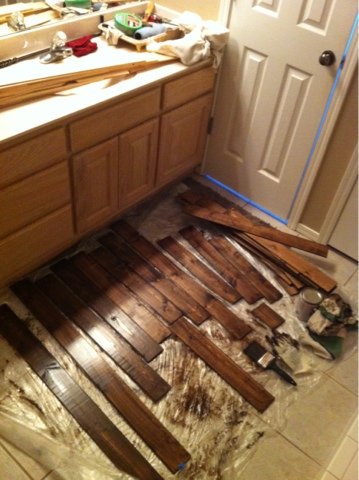
Most people use pallet wood to attach to their walls but I really didn't want to use that. So after some searching around I found this blog where she used EverTrue tongue and groove pine wood planks from Lowe's to do a wood wall (versus pallet wood) and knew that was the way to go. They come in a 6 pack of 8 foot long planks and are only 1/8 of an inch thick, which is almost the exact thickness of the tile around the tub so they sit pretty flush with each other. I needed 2 packages, which came out to a whopping $20. I can handle that!
Since we are lacking in the tool department I actually had to buy a miter box and saw. Yes I cut it all by hand. Took me like 3-4 hours to do but whatever. I got a workout. Don't laugh at my "tables" either! I just measured and cut as I went so I could see the layout and make sure my seam were scattered all over the place. I was smart and labeled the back of each piece so I knew where each one went when we were installing them. So it was like this First row was 1A (only one piece), 2nd row was 2A 2B 2C, Row 3 was 3A 3B, etc.

Then I drew out my grid on piece of paper and wrote on each piece where I wanted the stain light, medium or dark, then sorted them accordingly so I could go to town on staining each pile its assigned darkness. It probably not the smartest thing to do but I stained 2/3 of the wood in my bathroom early one morning. It was like 19 degrees outside and I just wasn't ready to face the cold (even though it was more like 30 degrees in the garage where I would be staining but still). I used Rustoleum's Dark Walnut and Kona, the quick drying kind.
So later that morning when I was ready to face the cold I moved everything out to the garage. Jimmy left with Kiera for some Dada/Daughter time and so I could have a good chunk of time to work on finishing up staining and sealing the wood. I can't remember what sealant I used, I think it's Cabot's, but it was satin marine grade that I use on our garden box. I was also able to finish up painting the bathroom before they got back.

After I let it dry for 24 hours it was time to add it to the wall. Mmmm, I love seeing the grain of the wood.

I added liquid nails to the back of each piece and then would hand it off to Jimmy so he could stick it on the wall and add finishing nails almost every piece. With both of us working on it this part went really fast. I was glad too because after being day number 4 of working on the bathroom I was tired of working on it. Long DIY remodels are not in my future. I painted the wall behind the wood brown so it would blend in where there are holes or notches in the wood. The previous green paint showing through would have looked ridiculous.

But that is all that I am letting you see for now! Muwahahaha! So evil, but I am not done decorating in there yet, which hopefully I will be able to add a few more things this weekend so you may get to see it next week!
Oh and please excuse all the photos, I took them with my iPhone 4 that my brother gave me. I will use my DSLR when it is completely finished to get much better pics.

1 comment:
Seriously!?? That's it? That's all you're going to show me right now? That's not right. So far I love it and I am so proud of you for cutting and staining all by yourself. It's going to be fantastic! The best part is that whenever anyone sees that wall they will be amazed and you will be so proud of your hard work.
Post a Comment